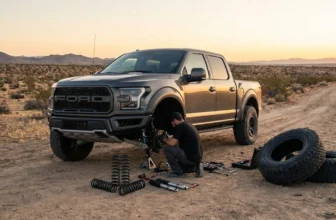
So, you’ve finally decided to pull the trigger. You’re done looking at stock trucks in the parking lot and feeling a little… short. You want that aggressive stance, the ability to chew up trails on the weekend, and let’s be honest—you just want your rig to look awesome.
Installing a lift kit is a rite of passage for any off-road enthusiast. It’s one of the most rewarding upgrades you can make, but it’s also one of the most intimidating. If you’re scrolling through forums reading horror stories about “death wobble” or snapped bolts and wondering if you’re out of your depth, don’t worry. You aren’t the first person to feel that way.
In this guide, we’re going to walk through the entire process of installing a suspension lift kit. We’ll cut through the technical jargon, keep things real about the difficulty, and make sure you have the info you need to get your truck in the air and back on the road safely.
The Reality Check (and Choosing Your Kit)
Before we even touch a wrench, let’s talk about what you’re getting into. Installing the best lift kit is a significant mechanical job. If your experience with cars is limited to refilling the windshield washer fluid, you might want to call a buddy who knows their way around a suspension—or consider a pro shop. But if you’ve changed your own brakes, oil, and maybe an alternator, you’ve got the baseline skills to handle this.
Suspension Lift vs. Body Lift
You’ll see these terms thrown around a lot. It’s crucial to know the difference for SEO (Search Engine Optimization) of your own build—meaning, optimizing your truck for exactly what you want it to do.
- Body Lift: This uses spacers to lift the cab of the truck off the frame. It gives you clearance for bigger tires and that taller look, but it doesn’t actually increase your suspension travel or ground clearance under the frame. It’s cheaper and generally easier to install.
- Suspension Lift: This is the real deal. You are replacing springs, shocks, control arms, and other structural components. This increases ground clearance, suspension travel, and off-road capability. This guide focuses on the suspension lift because that’s where the real magic happens.
Gathering Your Arsenal (Tools & Prep)
You cannot do this job with the rusty socket set you keep in your kitchen drawer. A suspension lift requires heavy-duty tools because suspension components are under massive tension and torque.
The “Must-Have” List
Here is your shopping list. If you don’t have these, buy, borrow, or rent them.
- Floor Jack and Jack Stands: Do not use the emergency jack that came with your truck. You need a high-lift floor jack and 6-ton jack stands. You need stands that are tall enough to support the frame while the suspension hangs down fully extended.
- Torque Wrench: This is non-negotiable. “Tight enough” is not a torque spec. Suspension bolts that are too loose can wobble and break; bolts that are too tight can snap under stress.
- Breaker Bar and Cheater Pipe: Suspension bolts have likely been on your truck since it left the factory, baking in rust and road grime. You need leverage.
- Penetrating Oil (PB Blaster or Kroil): Buy two cans. Start spraying every bolt you plan to remove three days before you start the project. Trust me on this.
- Spring Compressor: If you are doing a coilover lift or replacing coil springs, you might need this. Safety Warning: Coil springs pack enough energy to punch a hole through a wall (or you). You can often rent high-quality spring compressors from auto parts stores for free.
- Impact Wrench: Optional, but it turns a 10-hour job into a 6-hour job.
- Pickle Fork / Ball Joint Separator: For popping stubborn ball joints loose without damaging the boots.
Safety First (Seriously)
I know, safety lectures are boring. But dropping a 5,000-pound truck on yourself is a bad way to spend a Saturday.
- Level Ground: Never attempt this on a sloped driveway.
- Chock the Wheels: Before you lift the front, chock the rear wheels heavily.
- Shake Test: Once the truck is on jack stands, give it a hard shove. If it wobbles, reset the stands. Better it falls now than when you’re under it.
The Front Suspension Install
We usually start with the front because it’s the most complex. Most modern trucks (Ford F-150, Chevy Silverado, Ram 1500, Toyota Tacoma) use Independent Front Suspension (IFS). If you have a solid axle front end (like a Jeep Wrangler or heavy-duty Ram/Ford), the process is slightly different but follows similar principles.
Step 1: Disassembly
Lift the front of the truck by the frame so the front wheels are off the ground and the suspension is hanging freely. Remove the tires.
Now, you’re looking at the knuckle, control arms, and the strut/coil assembly.
- Disconnect the Sway Bar: The sway bar connects the two sides of your suspension. Disconnect the end links so the suspension arms can droop further.
- Remove Brake Line Brackets: Your brake lines and ABS wires are attached to the knuckle or control arm. Unbolt the brackets so they have slack. Never let the heavy brake caliper hang by the rubber hose. Use a zip tie or bungee cord to hang the caliper out of the way.
- Loosen Control Arms and Ball Joints: You’ll typically need to disconnect the upper ball joint to separate the knuckle from the upper control arm. This is where the pickle fork or a few hammer whacks on the knuckle (not the joint) come in handy to break the taper.
- Remove the Strut/Coil: Remove the lower strut bolts and the three nuts on the top of the strut tower (under the hood). Do not remove the center nut on the strut yet—that holds the spring under tension!
Step 2: Component Swap
If you bought a “loaded strut” assembly (spring and shock already assembled), you are in luck. You just swap the old one for the new one.
If you are just installing new springs or a spacer on your old struts, you will need to use the spring compressor. Compress the old spring until there is no pressure on the top hat, remove the center nut, swap the parts, and reassemble. Take your time here. If the compressor slips, it’s dangerous.
Step 3: Reassembly with New Parts
Now, the fun part: putting the shiny new parts in.
- Install the Lifted Strut: Bolt the top of the new strut into the tower. Leave the nuts loose for now to allow for wiggle room.
- Reattach the Knuckle: You might struggle here. Because the new strut is longer, the suspension geometry has changed. You may need to use a pry bar to push the lower control arm down enough to get the bolts lined up.
- New Control Arms (If applicable): Many lift kits come with new Upper Control Arms (UCAs) to correct the ball joint angle. If you have them, install them now.
- Tighten Everything (But Don’t Torque Yet): Get everything snug. We will do the final torquing later when the vehicle is on the ground. This is a crucial “pro tip” that prevents suspension bushings from binding and tearing.
The Rear Suspension Install
The rear is usually much easier. Most trucks use leaf springs in the back. A lift kit usually adds a “lift block” between the axle and the leaf spring, or an “Add-A-Leaf” to the spring pack itself.
Step 1: Support the Axle
Jack up the rear by the frame (just like the front) and support it with jack stands. However, you also need to support the rear axle with your floor jack. You will be disconnecting the axle from the springs, and you don’t want it to drop to the floor and stretch your brake lines.
Step 2: The Swap
- Remove Shocks: Unbolt the lower and upper shock mounts and remove the old shocks. The axle will drop slightly.
- Loosen U-Bolts: Do one side at a time! Loosen the U-bolts that hold the axle to the leaf springs. Lower the axle gently with the floor jack until there is enough space to slip in your new lift block or add-a-leaf.
- Install the Lift Method:
- Blocks: Simply place the block on the axle pad (make sure the alignment pins line up) and raise the axle back up to meet the spring.
- Add-A-Leaf: This requires clamping the leaf pack, removing the center pin, adding the new leaf, and putting a new center pin in. It’s more work but rides better than blocks.
- New U-Bolts: Always use the new U-bolts that came with the kit. U-bolts are designed to stretch when torqued; reusing old ones is a safety risk.
- Install New Shocks: Since the truck is lifted, your stock shocks are now too short. Install the longer shocks provided in your kit.
The “Shakedown” and Alignment
You’ve got the bolts in, the tires are back on, and the truck looks massive. You’re done, right? Wrong.
This is the step that separates a reliable build from a highway disaster.
1. Torque on the Ground
Lower the truck so its full weight is on the tires. Now you grab your torque wrench.
- Torque the control arm bolts.
- Torque the lug nuts.
- Torque the U-bolts.
- Check the manufacturer’s spec sheet for every single bolt you touched.
- Why do we do this on the ground? If you torque rubber bushings while the suspension is hanging, they will twist when the truck lands, leading to premature tearing and a terrible ride quality.
2. The Alignment
You must get an alignment immediately. Installing a lift kit completely changes your steering geometry. Your camber (vertical tilt of the tire) and toe (the direction the tires point) will be way off.
- Symptoms of skipping this: Your steering wheel will be crooked, your expensive new tires will be bald in 2,000 miles, and the truck might handle unpredictably.
- Pro Tip: Find a shop that specializes in lifted trucks. Standard alignment shops sometimes struggle with modified suspensions because the factory specs no longer apply perfectly.
3. Retorque After 500 Miles
Drive the truck for about 500 miles. Let things settle. Then, get back under there with your torque wrench and check everything again. U-bolts, in particular, are notorious for loosening up slightly after the first few heavy drives.
Common Installation Mistakes to Avoid
We’ve seen it all, so let’s help you avoid the “walk of shame” to the mechanic.
- Installing Parts Backwards: It sounds silly, but shock absorbers often have a specific orientation. Installing a directional shock upside down can ruin the valving.
- Ignoring Brake Lines: When your suspension droops off-road (flexing), your brake lines stretch. If you didn’t install the relocation brackets or extended lines included in the kit, you could snap a brake line on the trail. That means no brakes.
- The “Death Wobble”: This is a violent shaking of the front end, usually on solid-axle vehicles like Jeeps. It’s often caused by a loose track bar bolt or worn-out bushings. If you feel a shimmy, check your track bar torque immediately.
Conclusion: Is It Worth It?
Writing about lift kits is one thing; driving a truck you lifted yourself is another. There is a specific kind of pride that kicks in when you climb into the cab, sitting six inches higher than before, knowing exactly how every bolt underneath you is secured.
You’ve improved your approach angles for off-roading, you’ve cleared space for those 35-inch mud-terrain tires, and you’ve given your rig a commanding presence on the road.
Yes, your knuckles might be bleeding, and you might be covered in grease, but looking back at your truck sitting tall in the driveway? Yeah, it’s absolutely worth it.
Now, go wash up, grab a cold drink, and book that alignment appointment. The trails are waiting.


Hi, I’m Charles Larson. We do everything we can to support our readers with hundreds of hours of research and comparison testing to ensure you find the perfect tool for your workshop.