Picture this: You are boondocking in a pristine location. The campfire is out, the stars are bright, and the silence of nature is all-encompassing. You step inside to wash your hands, turn on the faucet! The silence is shattered by the aggressive jackhammer sound of your RV water pump.
If this sounds familiar, you aren’t alone. One of the most common complaints among RV owners, whether they drive a Class A diesel pusher or tow a modest travel trailer, is the excessive noise generated by the fresh water system.
The good news? You don’t have to live with it. As an automotive writer who has spent countless hours under the chassis and inside the cabinetry of recreational vehicles, I can tell you that 90% of pump noise is vibration, not the motor itself.
In this guide, we will break down exactly why your pump is so loud and provide a step-by-step masterclass on how to make your RV plumbing whisper-quiet.
The Root of the Problem: Why Is It So Loud?
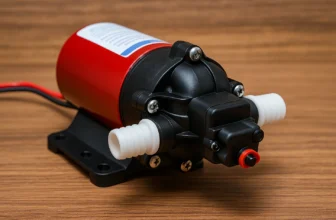
To fix the noise, you first have to understand the physics of it. Most RVers assume their water pump is broken or cheap because it’s loud. However, even top-tier pumps like the Shurflo 4008 or the Seaflo 42 Series can sound terrible if installed poorly.
There are two distinct types of noise occurring when you run water:
- Airborne Noise: The actual whirring sound of the electric motor and the diaphragm moving. This is usually a low hum and is rarely the issue.
- Structure-Borne Noise (Vibration): This is the culprit. RV manufacturers often screw the pump directly to the floor or a wooden wall. When the pump cycles, it vibrates. That vibration transfers into the wood, turning your entire RV floor or cabinetry into a giant speaker drum.
Furthermore, standard RV plumbing utilizes PEX piping—rigid, hard plastic tubing. When the pump pulses, that rigid pipe vibrates against walls, floors, and other pipes, creating a “rattling” or “hammering” sound.
The Goal: To quiet the system, we must isolate the pump from the RV structure and cushion the plumbing.
The “Zero Cost” Quick Fixes
Before you spend money on accumulator tanks or new pumps, let’s look at the installation errors that might be causing immediate issues.
1. Check for Airlocks
If your pump is making a sputtering, spitting, or exceptionally loud growling noise, you might just have air trapped in the line.
- The Fix: Turn on every faucet in the rig (hot and cold), flush the toilet, and run the shower. Let the water run steadily for 2–3 minutes to purge all air from the lines.
2. Inspect Mounting Screws
Ironically, over-tightening the mounting screws can make the pump louder. Most pumps have rubber feet designed to absorb vibration. If you drill the screws in too tight, you compress that rubber entirely, rendering it useless.
- The Fix: Back the screws out slightly. The pump should be secure, but the rubber feet should have some “squish” to them.
3. Isolate the Pipes
Open the access panel where your pump lives. Look at the outgoing pipes. Are they touching the wall? Are they touching each other?
- The Fix: Grab some household foam or even an old rag and wedge it between the vibrating pipes and the hard surfaces. If the noise drops significantly, you know your issue is pipe rattle.
The Essential DIY Upgrades (High Impact)
If the quick fixes didn’t solve it, it’s time to break out the toolbox. These methods are the industry standard for silencing RV water systems.
Method A: The “Silencing Kit” (Flexible Hoses)
This is the single most effective modification you can make. As mentioned, rigid PEX pipe transmits vibration perfectly. By installing a flexible loop between the pump and the PEX, you break that chain of vibration.
What you need:
- Two ½-inch flexible faucet connector hoses (braided stainless steel or vinyl).
- A ½-inch nipple coupler (if needed for your specific setup).
The Process:
- Safety First: Turn off the water pump switch and disconnect the city water supply. Open a faucet to relieve system pressure.
- Disconnect: Unscrew the rigid PEX lines from the inlet and outlet of the pump. Have a towel ready for drips.
- Install the Loop: Screw the flexible hoses onto the pump.
- Connect to PEX: Connect the other end of the flexible hoses to your rig’s PEX plumbing.
- The Loop Trick: Do not pull the hose tight. You want to create a loose loop (like a roller coaster loop). This loop acts as a shock absorber. When the pump shakes, the loop flexes, and the vibration dies before it hits the hard plumbing.
Pro Tip: You can buy pre-made “RV Pump Silencing Kits” from brands like Shurflo, which come with the correct fittings already attached.
Method B: Vibration Damping Mounts
If the floor is amplifying the sound, you need to decouple the pump from the floor.
The DIY Solution:
Don’t mount the pump directly to the wood.
- Get a thick piece of dense foam, a rubber mouse pad, or a scrap of yoga mat.
- Cut it to the size of the pump base.
- Glue or tape this soft material to the floor.
- Screw the pump through the soft material. This creates a “floating” effect where the vibration is absorbed by the foam before it hits the floorboard.
The Accumulator Tank (The Game Changer)
If you want a water system that feels like a residential home, you need an Accumulator Tank.
What is an Accumulator Tank?
It is a small pressurized tank (usually holding about 1 liter or quart of water) with an internal rubber bladder and an air cushion. It sits on the outlet side of your water pump.
How it Reduces Noise:
- Smoother Flow: It absorbs the pulsation of the pump, turning the “chk-chk-chk” flow into a steady stream.
- Reduced Cycling: Without a tank, if you run the water slightly (like trickling water to brush teeth), the pump cycles on and off rapidly to maintain pressure. The accumulator tank stores pressurized water. You can draw a cup of water or wash your hands without the pump even turning on because the tank pushes the water out first.
Installation Guide:
- Location: Install it on the outlet (pressure) side of the pump, anywhere in the line, though closer to the pump is better.
- Mounting: Can be mounted vertically or horizontally.
- Pressure Setting: Most tanks come pre-pressurized to 20-30 PSI. For best results, set the tank pressure to roughly 3 PSI below your pump’s cut-in pressure (check your pump manual, usually around 20-25 PSI).
Comparison of Solutions
| Method | Cost | Difficulty | Noise Reduction |
| Adjustment/Tightening | $0 | Low | 10-20% |
| Pipe Insulation | $5 | Low | 20-30% |
| Flexible Hose Kit | $15 – $25 | Medium | 50-60% |
| Accumulator Tank | $40 – $60 | Medium | 40% (Plus less cycling) |
| Combined All Above | ~$80 | High | 90-95% |
Pipe Insulation and Routing
Once you have handled the pump and the immediate connections, look at the plumbing runs throughout the RV.
Even with a quiet pump, water hammering can occur in the walls.
- Pool Noodles: The automotive DIYer’s secret weapon. Slice a cheap pool noodle lengthwise and wrap it around long runs of PEX pipe that sit against the floor or cabinetry.
- Clamps: Ensure your pipes are clamped down every 18–24 inches. Loose pipes swing and hit things. Use rubber-lined clamps (P-clips) rather than hard plastic ones to avoid transferring vibration to the chassis.
Upgrading the Hardware
If you have done all the above and the noise persists, your pump might be failing, or it might just be older technology.
Variable Speed Drive (VSD) Pumps
Standard pumps are single-speed: they are either fully ON or fully OFF. This binary operation creates loud start-up noises.
A Variable Speed Pump (like the Remco Aquajet) has a sensor that controls the motor speed. If you open the faucet halfway, the motor runs at half speed. They are significantly quieter, offer better water pressure, and generally do not require an accumulator tank.
- Note: These are more expensive ($150–$200+) and draw more amps, so check your battery bank capacity.
Step-by-Step Installation Safety Checklist
Before performing any of the modifications above, adhere to this safety protocol to avoid water damage or electrical shorts.
- Power Down: Locate your 12V DC fuse panel. Pull the fuse for the water pump. Just flipping the switch is usually fine, but pulling the fuse guarantees no accidental activation while wires are exposed.
- Depressurize: Open the kitchen and bathroom faucets until water stops flowing.
- Catch Pan: RV plumbing always holds residual water. Place a low-profile Tupperware container or a thick towel under the pump connections before unscrewing anything.
- Teflon Tape: When adding new fittings (like for an accumulator tank), use plumber’s tape (Teflon tape) on the threads to ensure a watertight seal. Wrap in the direction of the threads (clockwise).
- Leak Test: After installation, wipe all fittings completely dry with a paper towel. Turn the pump on and pressurize the system. Wait 10 minutes. Run a dry paper towel over the fittings again—any moisture indicates a slow leak that needs tightening.
Frequently Asked Questions (FAQ)
Is it normal for an RV water pump to be loud?
It is “common,” but it is not “necessary.” Manufacturers prioritize speed of assembly over noise reduction. A properly installed system should be a low hum, not a loud rattle.
Will adding an accumulator tank decrease my water pressure?
No. In fact, it often makes the pressure feel more consistent. It prevents the surging/pulsing effect, giving you a shower experience closer to your home plumbing.
Can I just wrap the pump in soundproofing material?
Be careful. Electric motors generate heat. While you can line the compartment with sound-deadening foam (like Dynamat used in cars), do not wrap the motor housing itself tightly in insulation, or you risk overheating the pump and shortening its lifespan.
How do I know if my pump is bad or just noisy?
If the pump leaks, fails to prime (sucks air but no water), or runs continuously without shutting off, it is likely failing. If it pumps water well but sounds like a jackhammer, it is a vibration issue, not a mechanical failure.
Conclusion: Enjoying the Silence
Quieting your RV water pump is one of the most satisfying DIY projects you can undertake. It is low cost, requires minimal tools, and the results are instant. You go from waking up the whole campsite every time you flush the toilet to a stealthy, residential-like water system.
My recommendation? Start with the Flexible Hose Loop and the Vibration Damping Mat. These two fixes solve the majority of noise complaints for under $30. If you are a full-timer, invest in the Accumulator Tank—your ears (and your pump’s longevity) will thank you.
Get your tools out, spend an afternoon under the sink, and get back to enjoying the peace and quiet of the great outdoors.


Hi, I’m Charles Larson. We do everything we can to support our readers with hundreds of hours of research and comparison testing to ensure you find the perfect tool for your workshop.