There is a subtle but distinct difference between a piece of furniture that looks “homemade” and one that looks “handcrafted.” Often, that difference lies in the edges. A sharp, 90-degree corner straight off the table saw feels harsh to the touch, holds paint poorly, and is prone to splintering.
Rounding the edges of your wood—whether it’s a simple “easing” of the corner or a full, decorative bullnose—is an essential skill in woodworking. It transforms a rigid board into something tactile and finished.
In this guide, we are going to walk through everything you need to know about how to round edges of wood. We will cover the heavy-duty power tools, the quiet satisfaction of hand tools, and the troubleshooting tips that keep your project from getting ruined in the final stages.
Why Round the Edges?
Before we dive into the “how,” let’s briefly touch on the “why.” You might be tempted to skip this step to finish a project faster, but here is why you shouldn’t:
- Durability: Sharp 90-degree corners are fragile. If you bump a sharp edge, the fibers crush and splinter. A rounded edge distributes impact, making the piece more dent-resistant.
- Paint and Finish Adhesion: Liquids (like varnish, stain, or paint) hate sharp corners. Surface tension causes the liquid to pull away from the tip of a sharp edge, leaving a thin, weak layer of finish that wears off quickly.
- Tactile Comfort: If you are building a desk, a chair, or a coffee table, human skin will contact the wood. A rounded edge feels softer and more inviting.
- Aesthetics: Light plays differently on a curve. A rounded edge catches a highlight that defines the shape of the furniture, adding visual weight and class.
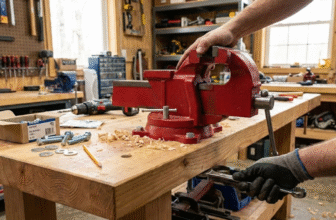
Method 1: The Router (The Professional’s Choice)
If you have a lot of edges to shape, or if you want a perfect, consistent radius every time, the router is the king of edge profiling.
Understanding the Roundover Bit
To round an edge with a router, you use a specific bit called a Roundover Bit.
These bits generally come with a ball-bearing pilot at the bottom. The bearing rides along the flat edge of your wood, preventing the cutter from digging too deep. The cutter itself is concave, creating a convex curve on the wood.
Common Radii sizes:
- 1/8” and 1/4”: subtle softening, great for cabinet doors and drawers.
- 3/8” and 1/2”: distinct rounded look, common on tabletops and shelving.
- 3/4” and larger: heavy, bold profiles for thick slabs or stair treads.
Handheld Router vs. Router Table
- Handheld: Best for large, heavy pieces (like a dining table) that you cannot easily move. You bring the tool to the wood.
- Router Table: Best for smaller, narrower strips of wood. You bring the wood to the tool. This is safer for small parts and offers more stability.
Step-by-Step: Routing a Perfect Edge
1. Test Your Depth Never touch your project piece first. Clamp a piece of scrap wood (of the same thickness) to your bench. Install your bit. If you set the bit too low, you won’t get a full round. If you set it too high, the bit will cut a “shoulder” or a step into the wood above the curve. Adjust until the curve flows perfectly into the flat surface.
2. Watch the Grain Direction This is where beginners fail. You must rout against the rotation of the bit.
- Handheld Router: Move counter-clockwise around the outside of the board.
- Router Table: Feed the wood from right to left.
3. Manage the End Grain End grain (the short side of the board) is prone to “tear-out” or splintering at the corners.
- The Pro Tip: Rout the end grain sides first. If a small chip breaks off at the corner, routing the long grain sides (second) will usually cut away that chipped area, leaving a crisp corner.
4. Don’t Burn the Wood Friction creates heat. If you move the router too slowly, the bit spins in one place and burns the wood fibers, leaving ugly black marks that are hard to sand out. Move at a steady, consistent pace.
Method 2: The Block Plane (The Traditionalist’s Choice)
Not everyone owns a router, and sometimes setting one up for a quick job feels like overkill. The low-angle block plane is a woodworker’s best friend for “breaking edges.”
The Faceting Technique
You cannot cut a perfect circle instantly with a flat blade. Instead, you create the illusion of roundness through facets.
- The 45-Degree Chamfer: Hold the plane at a 45-degree angle to the corner. Take long, sweeping shavings until you have a flat chamfer about the width you desire.
- Break the Corners: Now you have two new sharp corners on either side of your chamfer. Change your angle slightly to plane those off.
- Blend: Continue tilting the plane slightly with each pass, rocking it gently to blend the facets together.
- Finish: Once it looks roughly round, a quick swipe with sandpaper will blend the tiny facets into a seamless curve.
This method creates a slightly organic, hand-hewn look that is highly prized in fine furniture making.
Method 3: Sanding (The Beginner’s Choice)
If you don’t have power tools or planes, sandpaper is the universal equalizer. However, it requires patience and technique to avoid uneven, lumpy edges.
The “Shoeshine” Method
This is the best way to round a square leg or a dowel by hand.
- Cut a strip of sandpaper (cloth-backed sandpaper works best as it’s more flexible).
- Hold one end in each hand.
- Drape the sandpaper over the edge.
- Pull back and forth in a sawing motion while moving down the length of the wood.
- This naturally conforms to a round shape.
Using an Orbital Sander
You can use a Random Orbital Sander (ROS) to round edges, but be careful. Power sanders are aggressive. It is very easy to round one section more than another, resulting in a wavy profile.
- Technique: Turn the sander on and hold it at a 45-degree angle. Move quickly along the edge. Do not stop in one spot. Follow up with hand sanding to smooth out the transition.
Method 4: The File and Rasp (For Complex Curves)
What if your wood isn’t a straight board? What if you are rounding the edge of a curved tabletop or a decorative cutout? A router might be unstable here, and a plane won’t work on concave curves.
Enter the Rasp and the File.
- Rasps: Have coarse teeth for removing wood quickly. Use this to shape the curve initially.
- Files: Have finer teeth for smoothing the deep scratches left by the rasp.
The Technique: Push the file across the edge while simultaneously rolling your wrist. This “rolling” motion ensures you aren’t filing a flat notch, but rather creating a continuous curve.
Important: Easing vs. Roundover vs. Bullnose
For SEO context and clarity, it is important to define exactly what look you are trying to achieve, as the terminology changes the tool setup.
1. Breaking the Edge (Easing)
This is the minimal standard for all woodworking. You are barely changing the shape; you are just removing the sharpness.
- Tool: 120-grit sanding block or 3-4 swipes with a hand plane.
- Use: Internal structural parts, drawer sides, hidden framing.
2. The Roundover
This is a defined quarter-circle profile.
- Tool: Router with a 1/8″ to 1/2″ bit.
- Use: Table tops, shelf edges, chair arms.
3. The Bullnose
This is a full 180-degree semi-circle (the edge is completely rounded top to bottom).
- Tool: Bullnose router bit (requires precise fence setup) or extensive shaping with planes.
- Use: Stair treads, window sills.
Troubleshooting Common Problems
Even experienced woodworkers run into issues when rounding edges. Here is how to fix them.
Problem 1: Burn Marks
- Cause: Dull router bit or moving too slowly.
- Fix: Clean your router bits with resin remover. If the wood is already burned, you cannot just sand it lightly; the burn goes deep. You may need to use a card scraper or a lower grit sandpaper (80 grit) to remove the charred wood fibers.
Problem 2: Tear-out (Splintering)
- Cause: cutting against the grain or taking too big of a bite.
- Fix: If you are using a router, try taking two passes. Set the bit to cut half the depth first, then adjust it to the full depth for the final finish pass. This puts less stress on the wood.
Problem 3: The “Shoulder”
- Cause: The router bit was set too deep, cutting a square ridge next to the curve.
- Fix: You have to sand the flat surface down until it meets the curve, or use a block plane to shave the surface flush. In the future, always test on scrap wood!
Safety First: Respect the RPM
Rounding edges often involves removing safety guards on table saws or using routers spinning at 20,000 RPM.
- Eye and Ear Protection: Routers are incredibly loud and fling high-velocity chips.
- Dust Management: Some exotic woods are toxic when turned into fine dust. Wear a mask.
- Two Hands: Always keep two hands on the router. If you are routing a small piece, clamp it down. Never hold a small piece in one hand and a router in the other.
- Disconnect Power: Always unplug the router before changing bits. It sounds obvious, but it is the #1 cause of workshop hand injuries.
Conclusion
Rounding the edges of your wood projects is the signature of a craftsman. It shows you cared enough to think about how the piece feels, not just how it looks.
Whether you invest in a comprehensive set of router bits or simply keep a sanding block in your apron pocket, the act of softening those harsh corners will elevate your woodworking from “DIY” to “Fine Furniture.” Start with a simple “easing” on your next project, and feel the difference for yourself.
Frequently Asked Questions (FAQ)
Q: Can I round edges without a router? A: Absolutely. You can use a hand plane, a rasp, or simply a block of sandpaper. It takes more physical effort, but the results can be just as smooth.
Q: What is the best router bit size for a coffee table? A: For a standard 1-inch thick table top, a 3/8” or 1/2” roundover bit is the industry standard. It provides a substantial curve that is comfortable to rest arms on.
Q: Should I round edges before or after staining? A: Always round your edges before staining and finishing. The rounding process exposes new wood fibers that need to be prepped and sanded to the same grit as the rest of the surface to accept the stain evenly.
Q: How do I round the corner of a plywood sheet? A: Plywood layers can be tricky. A router works well, but be careful of splintering the thin veneer layers. Using a “climb cut” (carefully moving the router in the direction of rotation) can help, but sanding is often the safest method for plywood edges.


Hi, I’m Charles Larson. We do everything we can to support our readers with hundreds of hours of research and comparison testing to ensure you find the perfect tool for your workshop.