If you’ve ever tried to build a bookshelf using a standard saw blade, you know the struggle. You make a pass, nudge the fence an eighth of an inch, make another pass, and repeat until you think the groove is wide enough. Then you test the fit, and it’s sloppy.
Enter the dado blade.
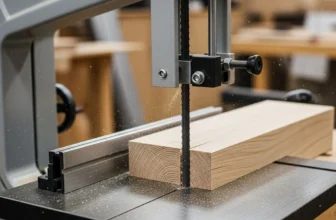
For US woodworkers, this tool is a total game-changer. It turns complex joinery tasks into single-pass jobs. Whether you are cutting dadoes for shelves, rabbets for cabinet backs, or tenons for furniture, learning how to use a dado blade is the single biggest upgrade you can make to your table saw skills.
But let’s be real: spinning a heavy stack of carbide at 4,000 RPM can be intimidating.
In this guide, I’m going to walk you through everything—from the confusing math of stacking chippers to the safety protocols that will keep your fingers attached. Let’s make some sawdust.
What Exactly Is a Dado Blade? (And Why You Need One)
In the United States, we are lucky. While our friends in the UK and Europe effectively banned these tools due to strict safety regulations (specifically regarding braking times and arbor lengths), they remain a staple in American workshops.
A dado blade isn’t a single blade; it is a system. It allows you to cut a groove much wider than the standard 1/8-inch kerf of a regular blade.
The Two Types: Stacked vs. Wobble
Before you buy, you need to know the difference.
- Wobble Dado Blades: These look like a single blade set on an angled hub. As it spins, it “wobbles” side-to-side to cut a wide path.
- Verdict: Skip it. They are notorious for vibrating your table saw, leaving curved bottoms in your cuts, and generally being a pain to set up.
- Stacked Dado Sets: This is the industry standard. It consists of two outer saw blades and a series of inner “chippers” and shims. You stack them like a sandwich to achieve the exact width you need.
- Verdict: Buy this. They cut flat bottoms, clean shoulders, and offer precision down to the thousandth of an inch.
Pro Tip: Invest in a decent 8-inch stacked set. A 6-inch set works for smaller contractor saws, but an 8-inch set gives you the depth of cut needed for deeper joinery. Brands like Diablo (Freud), Forrest, or DeWalt are solid choices found in most US hardware stores.
Safety First: Read This Before You Cut
I cannot stress this enough: A dado stack removes a lot of material very quickly. That means more resistance and more potential for kickback if you aren’t paying attention.
1. Check Your Arbor Length
Before you even open the box, check your table saw’s arbor. You need enough thread exposed to secure the nut fully after the blade is stacked. If the nut is only grabbing by a thread or two, do not run the saw. It is unsafe.
2. The Throat Plate Issue
You cannot use your standard throat plate (the metal insert around the blade). The opening is too narrow. You must buy or make a Dado Insert (zero-clearance insert) that accommodates the width of your stack.
3. SawStop Users
If you own a SawStop table saw, you must swap your brake cartridge. The standard brake is designed for a 10-inch blade. You need the dedicated Dado Brake Cartridge (usually blue) tailored for 8-inch dado stacks. If you forget this, the saw will not run, or worse, you’ll trigger a misfire.
4. Guards and Riving Knives
Here is the tricky part: You usually have to remove your blade guard and riving knife to use a dado blade, especially for non-through cuts (cuts that don’t go all the way through the wood). This removes a layer of safety.
- Action: Be hyper-aware of your hand placement.
- Action: Use push blocks (not just push sticks) to keep downward pressure and control the stock.
Step-by-Step: How to Set Up a Stacked Dado Blade
Setting up the stack is half the battle. It requires a bit of “woodworking math.”
Step 1: Determine the Width
Let’s say you are using 3/4-inch plywood. Here is the catch: 3/4-inch plywood sold in the US is rarely actually 0.75 inches. It is usually “undersized” (closer to 23/32″).
If you stack your blades to exactly 3/4″, your shelf will be loose. You need to measure the actual thickness of your material using calipers.
Step 2: Build the Stack
A standard set comes with:
- Two Outer Blades: Usually 1/8″ each. (Total: 1/4″)
- Chippers: Ranging from 1/16″ to 1/8″.
- Shims: Tiny plastic or brass discs for fine-tuning.
The Rule of Stacking: The teeth of the chippers should never touch the carbide teeth of the outer blades. Stagger them. If looking at the blade from the side, the teeth should be arranged like the steps of a spiral staircase. This balances the blade and prevents vibration.
Example Setup for Undersized Plywood:
- Left Outer Blade
- 1/8″ Chipper
- 1/8″ Chipper
- 1/16″ Chipper
- Plastic Shim (approx 0.010″)
- Right Outer Blade
Step 3: Tighten the Arbor Nut
Hand-tighten the nut first to ensure the chippers haven’t slipped off the arbor shoulder. Then, use your wrench. Do not over-tighten! The rotation of the saw naturally tightens the nut.
Step 4: Check Clearance
Spin the blade by hand. Ensure it clears your throat plate and isn’t hitting any internal components of the saw housing.
Making the Cut: Technique and Execution
Now that you are set up, let’s look at how to use a dado blade to get clean, square cuts.
The “Test Cut” Ritual
Never, ever cut your project wood first. Grab a piece of scrap wood. Run a test cut. Then, try to fit your shelf or mating piece into the groove.
- Too tight? Add a shim.
- Too loose? Remove a shim or swap a chipper.
- Just right? The fit should require a gentle tap from a mallet or firm hand pressure. If it falls out when you turn it upside down, it’s too loose.
Setting the Height
For joinery like bookshelves, a good rule of thumb is to cut 1/3 to 1/2 the thickness of the board.
- If using 3/4″ stock, set your blade height to roughly 1/4″ or 3/8″.
- Use a setup block or a ruler to set the height. Do not eyeball it.
Body Positioning and Feed Rate
- Stance: Stand with a wide base to the left of the blade line.
- Pressure: You need three directions of pressure:
- Forward (feeding the wood).
- Down (keeping the wood flat over the blade—crucial for consistent depth).
- Inward (keeping the wood tight against the fence).
- Speed: Feed the wood slower than you would with a regular blade. You are removing a massive amount of material. Listen to the motor. If it bogs down, slow down.
Advanced Techniques: Rabbets and Sacrificial Fences
A dado blade isn’t just for grooves in the middle of a board; it’s perfect for rabbets (grooves on the edge of a board).
The Danger of the Metal Fence
If you try to cut a rabbet right against your metal rip fence, you risk the dado blade hitting the fence. That is a disaster.
The Solution: The Sacrificial Fence
- Clamp a straight piece of scrap wood (like MDF or straight 1×4 pine) to your table saw fence.
- Position the fence so the sacrificial wood sits partially over the spinning dado blade.
- Turn on the saw and slowly raise the blade into the sacrificial fence.
- This creates a “tunnel” for the blade.
- Now you can slide your workpiece against the sacrificial fence to cut a rabbet right on the edge of the board without damaging your tools.
Troubleshooting Common Dado Problems
Even with 10 years of experience, things can go wrong. Here is how to fix the most common issues.
1. “Bat Ears” (Ridges in the Corners)
The Problem: The bottom of your groove isn’t flat; the outer corners are deeper than the center. The Cause: This is often a feature, not a bug, of ATB (Alternate Top Bevel) outer blades. Many high-end stacked sets have outer blades specifically ground flat to avoid this. The Fix: If it bothers you or affects the glue joint, use a router plane or a sanding block to flatten the bottom. Alternatively, ensure you bought a “flat-top grind” dado set.
2. Massive Tear-out
The Problem: The wood fibers shatter where the blade exits the cut. The Cause: Dull blades or lack of support. The Fix:
- Zero Clearance Insert: This supports the wood fibers right up to the cutter.
- Scoring: Use a marking knife to score your cut lines before sawing.
- The Tape Trick: Put a strip of blue painter’s tape over the area you plan to cut. It helps hold the fibers together.
3. Uneven Depth
The Problem: The groove is deeper at one end than the other. The Cause: You didn’t apply consistent downward pressure. As the board passed over the blade, it lifted slightly. The Fix: Use a featherboard mounted to your fence to keep the stock pressed down firmly against the table.
Quick Takeaways
- Safety: Always check arbor length and use a push block.
- The Stack: Stagger the chipper teeth so they don’t touch the outer plates.
- The Fit: Aim for a “friction fit”—tight enough to hold, loose enough to slide with pressure.
- The Shim: The secret weapon for undersized plywood.
- The Insert: Never run a dado stack with a standard throat plate.
Frequently Asked Questions (FAQ)
Can I use a dado blade on any table saw?
No. You need a table saw with an arbor long enough to accept the stacked blades. Most portable job-site saws (like smaller 8-inch models) or saws with short arbors cannot safely handle a full dado stack. Always check your owner’s manual for “Dado Capacity.”
What is the difference between a dado and a groove?
In US woodworking terminology, a dado runs across the grain (cross-grain), while a groove runs with the grain (rip). However, the dado blade is used to cut both.
Why are dado blades illegal in Europe but legal in the US?
The ban in the EU/UK is largely due to regulations requiring short stopping times for blades (electronic brakes). The heavy mass of a dado stack carries too much inertia for many braking systems to stop quickly enough. Additionally, many European saws have short arbors that physically cannot fit the stack.
Which way do the chippers face on a dado blade?
The teeth of the chippers (and the outer blades) should always point toward you (the operator) at the top of the rotation. They cut on the downward rotation at the front of the saw.
How do I stop plywood from splintering with a dado blade?
The best method is to use a fresh Zero Clearance Insert. If you are still getting tear-out, try scoring the cut lines with a razor knife before cutting, or apply blue painter’s tape along the cut line.
Conclusion
Learning how to use a dado blade effectively is a rite of passage for American woodworkers. It separates the “screw-it-together” crowd from the fine joinery craftsmen.
While the setup takes a few minutes, the time you save on the backend is worth it. You get stronger joints, cleaner lines, and the satisfaction of things fitting together with that perfect snug feeling.
Your Next Step: Go to your shop, unplug your saw, and practice setting up your stack to exactly 3/4 of an inch. Cut a test piece on scrap. Once you dial in that perfect fit, you’ll wonder how you ever built anything without it.


Hi, I’m Charles Larson. We do everything we can to support our readers with hundreds of hours of research and comparison testing to ensure you find the perfect tool for your workshop.